Exploring the Tubular Cast-On
by Sivia Harding
As someone who was a new knitter not too terribly long ago, I make it a point to try new things whenever possible, or incorporate new ways of doing the same old thing into a project. Thus, having heard about the tubular cast-on and seen pictures of its smooth, rolled edge, I decided to use it the next time I started a sweater in ribbing.
After consulting two experienced knitters and three books, and seeing many different ways to make the cast-on, I made a few swatches. This is a report on what I found was the easiest way to achieve that nice edge in a K2, P2 rib.
 This cast-on starts provisionally, in other words with waste yarn that will be removed later. You can use your favorite way to do this, or (as I did) simply knit two rows of stockinette stitch, starting with a purl row, in a smooth yarn approximately the same weight as your project yarn. Cast on half the number of stitches you will need for the finished piece, plus one. In other words, if your finished piece requires 44 stitches, cast on 23. After casting one, purling one row and knitting one row in waste yarn, then take your project yarn and continue with stockinette for four more rows, ending with a knit row.
Here is where the fun starts: purl the first stitch, and then with your right needle, pick up the first stitch in the row, four rows down, where you started your project yarn. You will see the row clearly as a row of different-coloured purl bumps surrounded by the waste yarn. Transfer the picked-up stitch to the left needle and knit it. Continue on, purling a stitch from the left needle, then picking up a stitch from below and knitting it, all the way across the row. You will have 45 stitches in K1, P1 rib.
At this point the waste yarn has fulfilled its purpose and can be removed. The simplest way to do this is to cut it close to the knitting and pick out the threads. Or, if you are like me and enjoy saving every bit of yarn, pull the yarn out one stitch at a time. You will be left with a smooth, elastic edge and one row of ribbing. Your four rows of stockinette have been rolled up like magic.
 Now, you might ask, how to get that nice K1, P1 edge to transform into K2, P2 ribbing? Easy. On the next row, cross every other two purl/knit stitches to make the proper sequence of purls and knits. Again, the easiest way I found to do this is to switch the stitches on the needles as you come to them. If this sounds too complicated (although it isn’t!) you can always use a cable needle to hold every other purl stitch to the back for one stitch, in effect crossing it to the back of the next knit stitch, then slip it onto the left needle and purl it. The result will be 44 stitches of K2, P2 ribbing, with one extra stitch to be decreased at the end of the row.
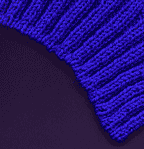
When I tried this, I was worried that the crossed stitches would show and look terrible, but they show only minimally, especially when a forgiving fibre like wool is used, although one side, which you can make the back of the piece, shows slightly more than the other.
I also tried this cast-on for ribbing in the round. (See the pink knitting in the picture below.) It worked quite well when I joined the round on the “crossing” row. The yarn tail can be used later to darn the edge together for a seamless look. I hope you will enjoy using this technique for lovely ribbed edges.
NOTE: Thanks to Paulette Lane and Rebecca Lau of the West Coast Knitters Guild in Vancouver, BC for sharing their time and expertise with me.
My other references were “The Harmony Guide to Knitting as a Creative Craft,” page 19; “The Big Book of Knitting,” by Katharina Buss, page 22; Knitters Magazine, Summer 2001, “Taming the Tubular Cast On Part 1,” by Charlotte Morris, page 72; and Vogue Knitting International, Fall 2001, “Cabling Without a Cable Needle,” by Meg Swansen, page 28.
© Sivia Harding 2003. All rights reserved. Visit Sivia’s website at: http://members.shaw.ca/siviaharding/index.html
